| |
| |
A Tridash program is made up of a number of components called nodes, which are loosely analogous to variables in other languages. Each node holds a particular value, referred to as the node’s state, at a given moment in time.
Nodes are created the first time they are referenced, by their
identifiers. Node identifiers can consist of any sequence of
Unicode characters excluding whitespace, parenthesis (, ), braces
{, }, double quotes " and the following special characters: ;,
,, ., #. A node identifier must consist of at least one
non-digit character otherwise it is interpreted as a number.
The following are examples of valid node identifiers:
name
full-name
node1
1node
There are few restrictions on the characters allowed in node
identifiers, meaning node identifiers may even contain symbols such as
|
A node can be bound to another node in which case its value is automatically updated when the value of the node, to which it is bound, changes.
The -> operator establishes a binding between the node on the left
hand side, referred to as the source, and the node on the right hand
side, referred to as the target.
Example.
a -> b
The spaces between the node identifiers and the bind |
In this example a binding is established between node a and node
b. The result is that when the value of a changes, the value of
b is automatically updated to match the value of a. This kind of
binding is known as a simple binding since a node is simply set to the
value of another node. Node a is referred to as a dependency node
of b, since b's value depends on the value of a, and b is
referred to as an observer node of a since it actively observes
its value.
We’ll use bindings to develop a simple application which asks for the user’s name and displays a greeting.
This tutorial targets the JavaScript backend and makes use of HTML for the user interface.
Some knowledge of the basics of HTML, i.e. what tags, elements and attributes are, is necessary to complete this tutorial. |
We’ll start off by creating an HTML file, called hello-ui.html, with
the following contents:
hello-ui.html.
<?
 self.input-name.value -> name
 name -> self.span-name.textContent
?>

<!doctype html>
<html>
    <head>
        <title>Hello Node</title>
    </head>
    <body>
        <h1>Tutorial 1: Hello Node</h1>
        <label>Enter your name: <input id="input-name"/></label>
        <p>Hello <span id="span-name"></span></p>
    </body>
</html>
Most of the file is HTML boilerplate, the interesting part is within
the <? ... ?> tag. The content of this tag is interpreted as Tridash
code. Tridash code tags can be placed almost anywhere in the file,
we’ve just chosen to place it at the top.
The Tridash code consists of two explicit binding
declarations. Declarations are separated by a line break or a
semicolon ;.
Tridash Code.
self.input-name.value -> name
name -> self.span-name.textContent
The declaration in the first line binds the self.input-name.value
node to the name node.
The node self.input-name is a special node that references the
input element, with id input-name, in the HTML file. HTML elements
can be referenced from within Tridash code, in the same HTML file,
using the expression self.<id> where <id> is substituted with the
id of the element.
The |
The node self.input-name.value, which references the value
attribute of the HTML element with ID input-name, is bound to the
node name. Thus whenever the value of input-name.value changes,
the value of name is set to it. In other words, whenever text is
entered in the input element, the value of name is automatically set
to the text entered.
In the second declaration, the name node is bound to the
self.span-name.textContent node. self.span-name references the
HTML span element with ID span-name, with the node
self.span-name.textContent referencing the textContent attribute,
i.e. the content, of the element. The result of this binding is that
whenever the value of the name node changes, its value is displayed
in the span element. As mentioned earlier, the value of the name
node is automatically set to the text entered in the input element,
thus the value entered in the input element is displayed in the
span element.
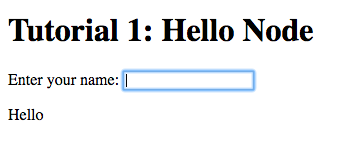
The application we’ve just written, simply prompts the user for his/her name and displays “Hello” followed by the user’s name directly below the prompt. Let’s try it out to see if it works.
Run the following command to build the application:
tridashc hello-ui.html : node-name=ui -o hello.html -p type=html -p main-ui=ui
That looks complicated, let’s simplify it a bit.
The tridashc executable compiles one or more Tridash source files,
generating an output file. The source files, in this case
hello.html, are listed after tridashc. The name of the output file
is given by the -o or --output-file option, in this case
hello.html.
The snippet : node-name=ui sets the node-name option, for
processing the source file hello-ui.html, to ui. This creates a
node ui with which the contents of the HTML file can be referenced.
The |
The -p option=value command-line options sets various options
related to the compilation output. The first option type is set to
html which indicates that the output should be an HTML file with the
generated JavaScript code embedded in it. The main-ui option is set
to ui, which is the name of the node referencing the contents of the
hello-ui.html file. It is the contents of this file that are used to
generate the output HTML file.
If all went well a hello.html file should have been created in the
same directory, after running the command.
Open the hello.html file in a web-browser with JavaScript
enabled. You should see something similar to the following:
Try entering some text in the text field, and press enter afterwards:
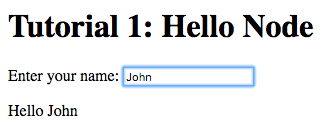
Notice that the text entered appears next to the “Hello” message
underneath the text field. This is due to the binding of the text
field to the name node and the binding of the name node to the
contents of the span element placed adjacent to the “Hello” text.
Now try changing the text entered in the text field:
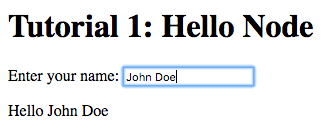
The text changes to match the contents of the text field. This demonstrates the automatic updating of a node’s state when the state of its dependency nodes changes.
When the state (the value) of the text field changes:
name node is updated to the text entered in the
field.
span element is updated to match the state of
the name node.
The previous application can be implemented much more succinctly using implicit bindings and inline node declarations.
hello-ui.html.
<!doctype html>
<html>
    <head>
        <title>Hello Node</title>
    </head>
    <body>
        <h1>Tutorial 1: Hello Node</h1>
        <label>Enter your name: <input value="<?@ name ?>"/></label>
        <p>Hello <?@ name @></p>
    </body>
</html>
Implicit bindings between an HTML node and a Tridash node can be
established using the <?@ declaration ?> tag. This is similar to the
Tridash code tag, seen earlier, however an implicit binding is
established between the nodes appearing in the tag and the HTML node
in which the tag appears.
If the tag is placed within an attribute of an element, an implicit
two-way binding is established between the element’s attribute and the
node, appearing in the tag. If the tag appears outside an attribute,
an HTML element is created in its place, and a binding is established
between the node appearing in the tag, and the content of the element
(referenced as textContent from Tridash).
With inline declarations it is not necessary to give the HTML elements unique ID’s unless they will be referenced from within Tridash code. In this example they have been omitted.
The bindings we’ve seen so far are one-way bindings, as data only flows in one direction, from the dependency node to the observer node.
Example: One-Way Binding.
a -> b
This is a one-way binding since the value of b is updated to the
value of a when it changes, however, a is not updated when the
value of b changes.
If a binding in the reverse direction is also established:
b -> a
the binding becomes a two-way binding since the value of each node is updated when the value of the other node changes.
The following simple application demonstrates two-way bindings:
ui.html.
<?
 a -> b
 b -> a
?>

<!doctype html>
<html>
  <head>
    <title>Two-Way Bindings</title>
  </head>
  <body>
    <h1>Two-Way Bindings</h1>
    <div><label>A: <input value="<?@ a ?>"/></label></div>
    <div><label>B: <input value="<?@ b ?>"/></label></div>
  </body>
</html>
The applications consists of two text input fields with the first
field bound to node a and the second field bound to b, using
inline node declarations.
In the Tridash code tag, a two-way binding between a and b is
established since a binding is declared in both directions:
a -> b
b -> a
Build the application using the following command, which is identical to the previous build command with only the source and output file names changed.
tridashc ui.html : node-name=ui -o app.html -p type=html -p main-ui=ui
Open the resulting app.html file in a web-browser, and enter a value
in the first text field:
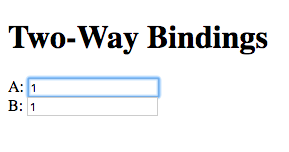
Notice that the content of the second text field is automatically updated to match the content of the first field.
Now change the value in the second field:
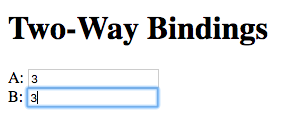
The value of the first field is updated to the value entered in the second field.
| | ||