| |
| |
The bindings in the previous tutorial were pretty boring and limited. Whatever was entered in the text field was simply displayed below it, verbatim. In-fact, this functionality is already offered by many web frameworks and GUI toolkits. The real power of the Tridash language comes from the ability to specify arbitrary functions in bindings which are dependent on the values of more than a single node. Moreover these bindings can be established in Tridash itself without having to implement "transformer" or "converter" interfaces/subclasses in a lower-level language.
A functor node is a node which is bound to a function of the values of one or more nodes. It consists of an expression comprising an operator applied to one or more arguments.
Functor Node Syntax.
operator(argument1, argument2, ...)
A binding is established between the argument nodes and the functor node. Whenever the value of one of the argument nodes changes, the expression is reevaluated and the value of the functor node is updated.
Example: Functor of one argument.
to-int(a)
The functor node is to-int(a) consisting of the function to-int,
which converts its argument to an integer, applied to the value of
node a. When the value of a changes, the value of to-int(a) is
updated to a's value converted to an integer.
Example: Functor of two arguments.
a + b
This is a functor node of the function + which computes, you guessed
it, the sum of its arguments, in this case a and b. Whenever the value
of either a or b changes, the value of a + b is updated to the
sum of a and b.
The |
The spaces between an infix operator and its arguments are
mandatory since |
Functor nodes can be bound to other nodes using the same -> operator.
Example: Binding functors to other nodes.
a + b -> sum
In this example node sum is bound to a + b which is bound to the
sum of a and b.
We’ll build an application which computes the sum of two numbers, entered by the user, and displays the result.
Let’s focus on building the interface for now. Begin with the
following ui.html file:
ui.html.
<!doctype html>
<html>
    <head>
        <title>Adding Numbers</title>
    </head>
    <body>
      <h1>Adding Numbers</h1>
      <div><label>A: <input value="<?@ a ?>"/></label></div>
      <div><label>B: <input value="<?@ b ?>"/></label></div>
      <hr/>
      <div><strong>A + B = <?@ sum ?></strong></div>
    </body>
</html>
An interface consisting of two text input fields is created. The first
field is bound to node a and the second to node b. Underneath the
fields the node sum is bound to an unnamed HTML element located next
to “A + B =”.
Nodes a and b are bound to the values of the two numbers. Node
sum is to be bound to the sum of a and b.
Before we begin writing the binding declarations we need to import the
nodes from the core module, you’ll learn more about modules in a
later tutorial, which we’ll be making use of in this application. The
following imports all nodes from the core module:
Import all nodes from module core.
/import(core)
Nodes a and b are bound to the contents of the text fields,
however the contents of the text fields are strings. We need to
convert a and b to integers in order to compute the sum. This is
achieved using the to-int operator.
The sum of the integer values of a and b is computed using the +
operator applied on the arguments to-int(a) and
to-int(b).
Computing Sum of a and b.
to-int(a) + to-int(b)
Finally, we need to bind the sum to the node sum in order for it to
be displayed below the fields.
to-int(a) + to-int(b) -> sum
Adding the declarations, we’ve written so far, to a Tridash code tag (somewhere in the file such as at the beginning), completes the application.
Tridash Code Tag.
<?
 /import(core)

 to-int(a) + to-int(b) -> sum
?>
To simplify the build command, the build options are specified in a build configuration file.
The build configuration file contains the list of sources, along with the source-specific options, and the output options in YAML syntax (see https://yaml.org for details).
Create the following build.yml file:
build.yml.
sources:
  - path: ui.html
    node-name: ui

output:
  path: app.html
  type: html
  main-ui: ui
The outer structure of the file is a dictionary with two entries
sources and output.
The sources entry contains the list of source files either as a path
or as a dictionary with the path in the path entry and the
processing options in the remaining entries. In this application there
is one source file ui.html with one source processing option
node-name set to ui.
The output entry is a dictionary containing the path to the output
file in the path entry, in this case app.html, and the output
options in the remaining entries, in this case type = html and
main-ui = ui which are the same options as in the previous
tutorials.
To build from a build configuration file run the following command:
tridashc -b build.yml
The -b option specifies the path to the build configuration file
containing the build options. All other command line options are
ignored when this option is specified.
Open the app.html file in a web browser, and enter some
numbers in the text fields:
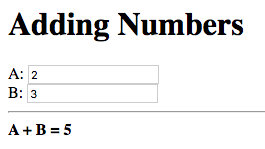
Notice that the sum of the numbers is automatically computed and displayed below the fields.
The sum will only be displayed once you have entered a valid number in each field. |
Now try changing the numbers (remember to press enter afterwards):
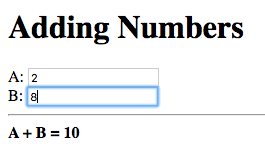
Notice that the sum is automatically recomputed and the new sum is displayed.
The to-int operator is special in that a two-way binding is
established between its argument and the functor node. Thus the
declaration to-int(a) also establishes the binding to-int(a) -> a.
The binding in the reverse direction, from functor to argument, has
the same function as the binding from the argument to the
functor. Thus in to-int(a) -> a, a is bound to the value of
to-int(a) converted to an integer.
This allows a binding to be established with a to-int functor node
as the observer.
Example: Binding with to-int as observer.
x -> to-int(a)
In this example, to-int(a) is bound to x. Whenever the value of
x changes, the value of to-int(a) is set to it, and the value of
a is set to the value of to-int(a) converted to an integer.
With this functionality, the application in this tutorial can be implemented more succinctly by moving the integer conversion from the Tridash code tag to the inline node declarations.
Replace the declaration:
to-int(a) + to-int(b) -> sum
with:
a + b -> sum
Replace <?@ a ?> and <?@ b ?> with <?@ to-int(a) ?> and <?@
to-int(b) ?> respectively.
The benefit of this is that the value conversion logic is moved closer
to the point where the values are obtained, rather than being littered
throughout the core application logic. Nodes a and b can now be
used directly, without having to be converted first, since it is known
that they contain integer values.
To simplify the application further, the sum node can be omitted
entirely and <?@ sum ?> can be replaced with <?@ a + b ?>.
Improved Application.
<?
 /import(core)
?>
<!doctype html>
<html>
    <head>
        <title>Adding Numbers</title>
    </head>
    <body>
      <h1>Adding Numbers</h1>
      <div><label>A: <input value="<?@ to-int(a) ?>"/></label></div>
      <div><label>B: <input value="<?@ to-int(b) ?>"/></label></div>
      <hr/>
      <div><strong>A + B = <?@ a + b ?></strong></div>
    </body>
</html>
The |
| | ||